Bridging Designer’s Template with Intuitive Families to your Working Template (AS9926)
As discussed in my session Revit++: More with Your Revit, More for Your Workflow session at Autodesk University 2015, when you use your designer’s template that contains intuitive families, you would want to use them in your project during the design development phase. But these intuitive families use instance parameters. Using instance parameters won’t be compatible enough in your schedules if you use schedules.
This post will provide you steps in converting your intuitive families to a more manageable “usual” families (those we are accustomed to) to be able to work smoothly with schedules, as well as eliminate discrepancies and inconsistencies that is presented in the intuitive families.
I would like to introduce here a program that is built for passing values from an instance parameter controlled family to its corresponding type-controlled twin family.
Did I say “twin”? Yes. Those two families must be identical with each other, the only difference being the other twin uses type parameters.
The prerequisites for using this program are mentioned below, and with them are steps to do it.
Creating the Twin Family
First, it is just simple. You have to save a copy of your existing family that has the instance parameters.
Then just make the instance parameters into type parameters.
But be careful! Some parameters will mess up your family when to switch them into type parameters, eventually tell you to delete the family when it fails to load in your project. This is a well-known issue especially when you try to convert an array parameter or a dimension parameter. Input some values before pressing the Apply button, and test them before loading it to your project.
Parameter Pairing
An optional effort but is handy when you started to use the program above to convert your families.
To have an idea of what to do, just list up all the instance parameter you used particularly in one family. Then create a type parameter to pair with every instance parameter you have. You just have to put a distinctive character or letter for your type parameter to differentiate it with the instance parameter.
For example, if you have an instance parameter that is named “Opening Height”, you create a type parameter that has a name such as “T Opening Height”. Remember to keep the same variable types!
Then use these parameters instead of re-assigning the existing instance parameters to type parameters. This is somewhat safer.
Using the Tool
Before using this tool, make sure you loaded all the twin families of all the instance-parameter-based families you use in your model.
1.) Select any instance of an instance-parameter-based family in your model. Click “Finish” button on the left side of the option bar to continue.
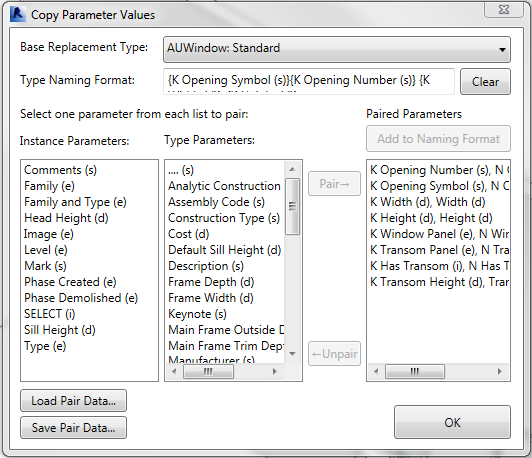
2.) A window like the figure above will appear.
All the editable instance parameters of the family instance you selected will be listed in the Instance Parameters column.
Take note that the letters enclosed in parentheses indicate what kind of variable the parameter is. The meaning of these letters are written below:
i = integer
d = real number
e = element id
s = string of text
n = none
3.) Select the type of the twin family from the Base Replacement Type area. All the editable type parameters of the selected family type will be listed in the Type Parameters column, with the kind of variable similar to those in instance parameters.
4.) Select a pair of parameter by selecting one parameter from the instance parameter list and another from the type parameter list.
Make sure the “Pair->” button will be highlighted. If not highlighted, make sure that the parameters you selected have the same kind of variable.
5.) Click the “Pair->” button. The selected parameters will be listed on the Paired Parameters column, and they will be removed from their respective columns.
6.) Repeat 4 and 5 to create other pairs of parameters.
7.) To remove a pair item from the Paired Parameters column, click an item and click the “<-Unpair” button. This will remove the item from the list, as well as return the parameters to their respective columns.
8.) When you listed enough items in the Paired Parameters column, it is time to designate a type naming format.
Select an item in the column and click “Add to Naming Format”. This will automatically add a string of text to the text entry.
9.) To add a character in the naming format, add it between the } and { characters. Adding between the { and } will damage the format and will yield to unexpected results in your family type name.
10.) To save the pairing data for use later, click “Save Pair Data…” button on the lower left of the window.
11.) Click the OK button when all is done.
The Best Practice
When you are already decided to build and use your designer’s template and also want to switch to your usual working template for your design development phase and construction documents phase, it is better to create a new family derived from an existing family, so that later you can easily change the type parameters to instance parameters and test operate them without having the “unable to create” error message and eventually delete them.
On the other hand, if you don’t have that family you want to use, you can just create you own, but be sure you assign type parameters first to that properties of that family. Then you derive them and change to instance parameters.