View-ViewModel-ing for your WPF Windows (Revit API with WPF Series 3/3)
This is a long overdued post. Apologies for the very long wait. If I would be allowed to make an excuse, I became busy working on a Dynamo package named Celery, which is still on a pre-beta release due to much time dedicated to my company work and physical workouts.
I will still process some of the codes and images that this post needs. So please stay tuned for the update.
Anyway, let’s go to the real topic.
In this part of the series, we will tackle how to associate values between the plugin class and the view model class, and between the view model class and the WPF window.
First, create some controls within the window like the one I did below.
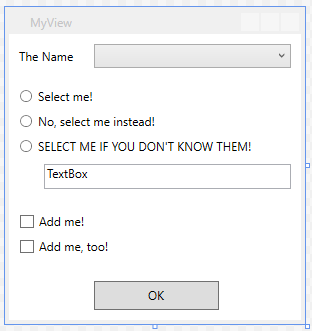
We have a combo box, three radio buttons, a text box, two checkboxes, and an OK button. These are some of the controls that are frequently used in windows. We need to associate some variables to the each of the controls, except for the radio buttons, which shares one variable.
To associate them, we need to create a definition class that we will call the view model class.
Before creating a view model class, let us download first the “Prism” library from nu-get. We will be using the Prism library as our base library for our MVVM classes.
Now, we create a new class file for our new view model class. Let’s name it “MyViewModel.cs”. Open the newly created file and modify the file so that it inherits function we need for class to become a view model class:
using Prism.MVVM;

namespace MyRevitWPFProgram
{
class vmodThisWindow : BindableBase
{

}
}
The BindableBase base class is just a simplified class derived from INotifyPropertyChanged interface class, and has the event declaration and function already contained in it.
Now we create the variables we need. All the controls have their corresponding types of variable so we must know what to assign to which. When gathering a string of text from a TextBox, we need a string variable. When we need a number for a TextBox, we need a number variable with a string converter. When we need something to monitor if an item is checked or not, a boolean for each of them, or an integer with converter and parameters for radio buttons. WPF beginners can get more details regarding these on the internet.
But one thing I would like to recommend: DO NOT USE ANY OF THE REVIT CLASSES WITHIN THE VIEW MODEL. Using these classes will not let you use the capabilities of WPF automation functions in Visual Studio, and eventually the window will not display in the Design Screen disabling you to modify the contents of your window graphically. I have just verified this even very lately with the Visual Studio Community 2015.
So I declare my variables for my window something like below.
private ObservableCollection<string> _StringSelection;
private string _selectedString;
private int _radioOption;
private bool _isSelectedOption3;
private bool _isSelectedAddMe;
private bool _isSelectedAddMeToo;
private Dictionary<string, int> _dicIdString;

public ObservableCollection<string> StringSelection
{
get
{
return _StringSelection;
}

set
{
_StringSelection = value;
}
}

public string SelectedString
{
get
{
return _selectedString;
}

set
{
_selectedString = value;
RaisePropertyChanged("SelectedString");
}
}

public int RadioOption
{
get
{
return _radioOption;
}

set
{
_radioOption = value;
RaisePropertyChanged("RadioOption");
}
}

public bool IsSelectedOption3
{
get
{
return _isSelectedOption3;
}

set
{
_isSelectedOption3 = value;
RaisePropertyChanged("IsSelectedOption3");
}
}

public bool IsSelectedAddMe
{
get
{
return _isSelectedAddMe;
}

set
{
_isSelectedAddMe = value;
RaisePropertyChanged("IsSelectedAddMe");
}
}

public bool IsSelectedAddMeToo
{
get
{
return _isSelectedAddMeToo;
}

set
{
_isSelectedAddMeToo = value;
RaisePropertyChanged("IsSelectedAddMeToo");
}
}

public Dictionary<string, int> DicIdString
{
get
{
return _dicIdString;
}

set
{
_dicIdString = value;
}
}
Here are the major tips that I would suggest when declaring variables in creating a view model class:
a. ) When you have a combo box in your window, know its purpose. For example, if you want to put data of some of the family types and select only one of them, use a Dictionary class and assign the names as keys, and the IntegerValue of the Ids as values. However, if the content seem to be complex (e.g. materials with name, id and color as you primary info), create a unique class for that content and include only the variables that you need. In this case, you may use either the simple List<> class or a more sophisticated IObservableCollection<> class (but since most of the time the contents of the combo box do not change, List<> will be enough).
When you create a Dictionary, never forget to input the word “Key” in the DisplayMemberPath property, and the word “Value” in the SelectedValuePath property. This will make the combo box propagate only the keys to show in the combo box, and when one is selected, return its corresponding integervalue of the id.
On the other hand, when using list of classes, use the Binding procedure to bind a class item to the DisplayMemberPath what to show in the combo box, and another class item to the SelectedValuePath property.
On both cases, bind a variable to the combo box’s SelectedValue property, with the type the same as what you bind in the SelectedValuePath property. This variable must be independent, and you may not need to add an RaisePropertyChanged() function to it.
b.) When declaring variable with get-set and takes part of the user input handling from any of the controls inside the window, always call the RaisePropertyChanged(“<name of the public variable>”) on the last part of the ‘set’ segment.
c.) Do not include arguments in the constructor. Do not also create overloads of the constructor. Do all the variable assignments after creating the view model class.
Automating the Binding Procedure
When all the variables are declared, COMPILE FIRST THE PROGRAM AND MAKE SURE IT IS FREE OF ERRORS. Otherwise, you cannot use the interactive approach of binding contexts to the WPF window.
Now we will use this interactive approach to bind the view model class to our XAML window.
Select the window frame in the design view of the XAML, and from the Properties window, go to the DataContext property and click the “New” button adjacent to it. This will bring you to the window further below.

Select “MyViewModel” class from the nested list and press OK. This will automatically integrate your view model to your WPF window.


In the image above, you can verify that Visual Studio made us bind our view model class to the WPF window by enclosing our view model class with the <Window.DataContext>.
Next we bind our variables to the window controls the similar way.
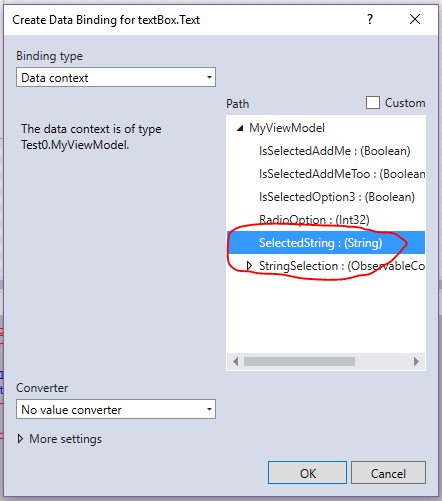
First, select the TextBox from the design view, and from the properties, click on the small box on the right (which is shaded black; it indicates it has a set value).

Then from the context menu, select “Create Data Binding…”

This will bring you to another window like the one below.
Make sure the Binding Type is set to Data context, so that you can see the view model class we created on the right side of the window. Expand MyViewModel, and there comes all the variables we declared. Select the SelectedString : (String) and press OK.
Now we can check from the XAML code if it made us the binding. It should be like I have below. You can see that in the Text property of the TextBox SelectedString is bound to it.

Binding the Radio Buttons
One complicated area here is binding three radio buttons in a single variable that is RadioOption. We will be using a converter and integrate converter parameters in each of the radio buttons.
Below is how I wrote my Converter class. I created a new class named MyConverterRadioButton, which is derived from the IValueConverter interface.
public class MyConverterRadioButton : IValueConverter
{
public object Convert(object value, Type targetType, object parameter, CultureInfo culture)
{
return (parameter.ToString() == value.ToString());
}
public object ConvertBack(object value, Type targetType, object parameter, CultureInfo culture)
{
return (bool)value ? parameter : Binding.DoNothing;
}
}
Since we are using the automation features in the Properties window of Visual Studio, we will associate the converter class to all the radio buttons.
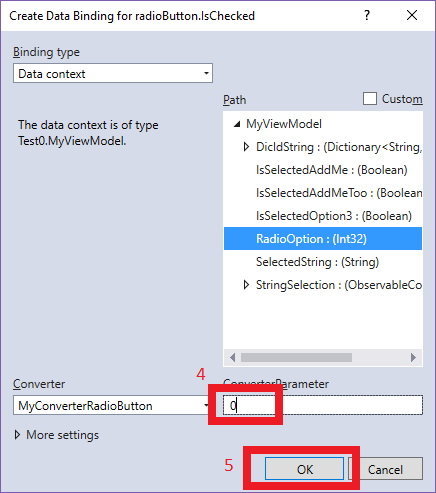
In the properties window, click the square on the right of the IsChecked property to reveal the window below. On the right hand side of the window, selected RadioOption variable (1), and then pull down the combo box in the Converter option below (2), and then select “<Add value converter…>” (3)

This will bring you to a child window like the one below. If the converter class you created appears (in this case, MyConverterRadioButton), then select the class and press OK. Otherwise, revert and compile the program first before returning to this window.

When the converter class is selected, we can now assign a converter parameter in each of the radio buttons using the previous window. In the ConverterParameter field, enter “0” for the first radio button, “1” for the second, and “2” for the third one (4). Press OK when done (5). The result will reflect in the XAML code.
Next we associate the text box to be enabled for editing once the third radio button is selected. Select the Text Box of the window, and in the Properties panel, press the square on the right side of the IsEnabled property. Then from the context menu, select Create Data Binding.
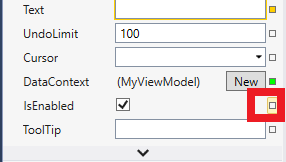
From the window, select the variable IsSelectedOption3 (1) and press OK (2).

Then we will just update our view model class with the code below inside the RadioOption set function in order to activate it every time the third radio button is selected, and deactivated otherwise.
public int RadioOption
{
get
{
return _radioOption;
}
set
{
_radioOption = value;
IsSelectedOption3 = value == 2;
RaisePropertyChanged(“RadioOption”);
}
}
Binding the Checkboxes
Binding the Checkboxes is straightforward as the method is similar with others mentioned above. But this time, we have to click the square of the IsChecked properties of the two checkboxes, and create the data bindings. Use IsSelectedAddMe and IsSelectedAddMeToo correspondingly.

Binding a Button Command
Although this area does not play a significant role in our example, it is essential to learn how to bind them and how they function when the program is executed.
Add this code inside the view model class and re-compile the program.
#region Commands and Actions
public ICommand OKCommand
{
get
{
return new DelegateCommand(OKAction);
}
}
private void OKAction()
{
// This function will be executed after the button events.
}
#endregion
We simply give an action to the OK button whenever it is pressed. To give the event an action compatible with MVVM, first we create a variable OKCommand out of an ICommand class. Then inside its get function, the code just returns a new declaration of DelegateCommand that has an argument of OKAction, which will be a void function to be invoked. DelegateCommand is a function from Prism, so be sure Prism is installed in your project to be able to use it.
Once the command is called, the function invoked will execute, however, as mentioned in the comment above, OKAction will be executed after its event when pressed. So for example, you make an event from the Button named OKButton_Click(). The code inside OKButton_Click() will be executed first, before OKAction(). You can always verify it by debugging the program and see for yourself.
Now you know the sequence of the execution of the command events defined by the usual events and MVVM events, plan the program into its importance; what must come ahead and behind, or maybe, the necessity of each other. In this case, since the OK button is the only button, we may not add code inside the OKAction, but when it comes to other buttons, this trick may come handier.
Now we finished defining our Command events for our button. Compile it and see if there are errors. If there are none, let us bind it from the Properties window.
In the Miscellaneous group of the Properties window, there is an item there named Command. This item accepts any variable of type ICommand, which will be made clear further below. Click the square on its right and from the context menu, select Create Data Binding.

In the window, select the OKCommand variable (1) and press OK (2). If you notice, OKCommand is variable of ICommand, which is recognized by WPF.

…to be continued.
Hello,
1- How do you run ExternalEvent (IExternalEvent) from a viewmodel?
2- You say “DO NOT USE ANY OF THE REVIT CLASSES WITHIN THE VIEW MODEL”. Can you give the revived document as a parameter to the viewmodel?
Thank you very much and very sorry for the very late reply.
Well, theoretically you can always put Revit API classes such as ExternalEvent or Document in your view model, but you will compromise the automation of the View-ViewModel interaction in WPF once you assign it as the DataContext in your WPF view (let alone the thing that window does not display), and you will end up more likely into manually writing the XAML codes.
As for me, I do not want to risk this automation capability, so instead of putting these Revit API classes in the view model, I would rather create a difference class which is not a view model, and create static functions that you can call even from the view model.
I have previously created a program that needs to run and ExternalEvent inside a WPF-MVVM window and as far as I can remember I declared it outside the view model. It worked without any problems. I will post an example of this when I am able to retrieve the program.
Regarding the Document variable to be used as a parameter or variable of a view model, I had done it many times when I was starting to introduce WPF in all of the programs I create, and I was risking the automation feature and manually inputting all the XAML codes and it was a pain. But if you don’t mind coding XAML, you may not need to worry about the Document and other Revit API classes because they will always work inside the view model.
I just wanna ask though, what is your purpose of using a revived document inside a view model?
Hi,
Thank you for the amazing tutorial. Is there any chance you will continue doing the series?
I would love to have some sample of a complete project so I can follow along, the SDK has a few but it’s complicating and does not follow MVVM pattern which make the code very messy.
Hello there. Thank you very much for following!
Yes, in fact, I will be writing a few more for the following months due to some discoveries I did and I wanna share them with you. My apologies for hanging this series in the air for a long time. But hang in there.
Thank you for the fast reply,
I appreciate you sharing your knowledge with the community as there are not a lot of resources about revit api with wpf. In the mean time can I ask you some questions? (Sorry if this sound absolutely novice, I only started programming 2 months ago).
I created a class which is an IExternalCommand,it finds all floors and join them with connecting walls, columns, beams(I guess this is the Model part of MVVM). I also made a wpf window with a combobox which allow user to choose which family the floor joined to (wall or column or beam). So, I want to bind the option user selected to the string inside my collector: FilteredElementCollector(doc).OfClass(typeof(…)). I have declared the variable in the ViewModel, how should I assign this variable in my Model?
Also, how do I tell the program to execute the command after user click the OK button in window? You said not to use any revit classes in the View Model so how should I reference it back to the Model class?
Thanks in advance for your time and patient.
To answer your first question, as a practice I often use a combo box and bind it with a dictionary declared inside a view model, which in this case, of string of keys and integer of values that come from every element’s ids. With this way I can avoid using the ElementId class. Bind them to the combo box’s ItemSource and then “Key” to the DisplayMemberPath and “Value” to the SelectedValuePath. Aside from this, you also need to create another variable of type int that handles the selected item, for which to bind this to the SelectedValue of the combo box. This variable can be processed outside the WPF window whenever you are finished using the window because it is already updated by the window. Just don’t forget to declare a variable of your view model and assign it to the window’s DataContext before the ShowDialog.
Now, if you really want to use Revit classes while inside the WPF window, you need to create a model with the Revit classes (I call this a Revit bridge class) and declare this Revit model class inside your view model, initialize this class with a constructor when you declare a new view model inside the Execute() before you assign the view model to the WPF window’s DataContext.
This one deserves a new blog post so I will discuss more on this later.
Thank you for the quick reply,
With your help, I have successfully bound the dictionary to the combobox in View. But I’m still struggling to feed the bound variable into my command. From my understanding, my Revit command class(which is IExternalCommand) will be in a separate model class, and will be declared in the ViewModel, and used by the Execute command (a Delegate command). But the Execute method of IExternalCommand only take 3 variables (ExternalCommandData commandData,ref string message,ElementSet elements), I don’t know how to feed my new variable into this command. Can you shed some light into this matter or am I completely misunderstanding the problem?
Again, thank you and hope to hear from you soon.
You don’t have to create a Revit model class using the IExternalCommand interface. You may create it as a mere model class. And you don’t need to use the Execute function.
Instead, define a variable each for UIApplication, Application and/or a Document class. Then in your viewmodel, use these variables in your model whenever you create a variable of this model class and function(s) that you can always call from your viewmodel using commands and actions. Lastly, when you declare a viewmodel in your Revit command’s Execute() function, assign the UIApplication, Application and/or Document variables coming from commandData to the variable defined as the Model class inside your viewmodel class.
I will post a new blog regarding this one for everyone to easily understand. So please be patient and wait until next week.
I will patiently wait for your new blog. Thank you for your time.
This question does not have to do with the course, although they are very good and explicit. My English is not very good.
I want to create a label through the Metric Generic Tag template and add the shared parameter. You will have an idea of how to start.
Thanks for your time.
Hi there, Rey.
In that case, if you haven’t done so, you need to create a shared parameter for the tag you want to create. Just make sure about the variable type you are using. Basically, it is a text or a number. You have to assign a category or several categories to this parameter though.
Then you just create a Generic Tag with a label and assign there the shared parameter you created. That, of course, will only show when there is a value set to the parameter of those elements with their categories that has the shared parameter set, whenever you tag those elements.